Method
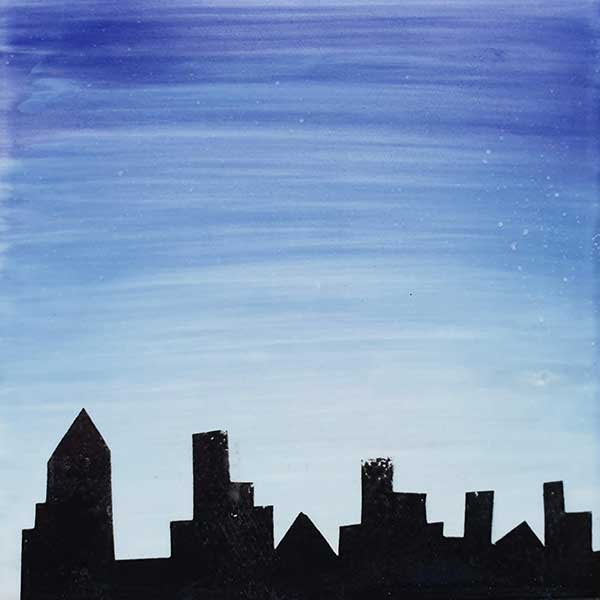
This design blends light, mid and dark blues together to create a sky. Using paper resist, you can add silhouette buildings and flicked white paint to add some snow.
Some ideas for skyline layouts can be downloaded
here.
For this example, we have used
21 – My Blue Heaven
23 – The Blues
24 – Moody Blue
1 – Cotton Tail
36 – Tuxedo
- You’ll need to split your piece of pottery into three sections, using a felt tipped pen. Remember that this ink will not survive the heat of the kiln and will burn away.
- These three sections will dictate the graduation of blues. So the bottom third will mainly contain the lightest blue, the middle section the mid blue and the top section the darkest blue.
- Starting with 21 at the base, 23 in the middle and 24 at the top, using long horizontal brush strokes, blend the colours together. Add some extra interest by using the mid blue, gently sweeping into the lightest blue.
- Use a toothbrush to flick white paint all over. Use gentle flicks for small, subtle dots.
- Cut out a skyline using paper – remember the buildings are what you need, so you’ll need to cut the buildings out with this in mind. There are a few layout suggestions in the how to pack.
- Using water, stick down the paper skyline to the item and press down to ensure a close contact. Do not rub the paper.
- Using a small sponge, add 36 to the buildings.
- Peel off the paper.
This design is easier to create on items of bisque that have a flat side. Square plates, pencil pot, rectangular vase, wine coolers all make great items to carry this design