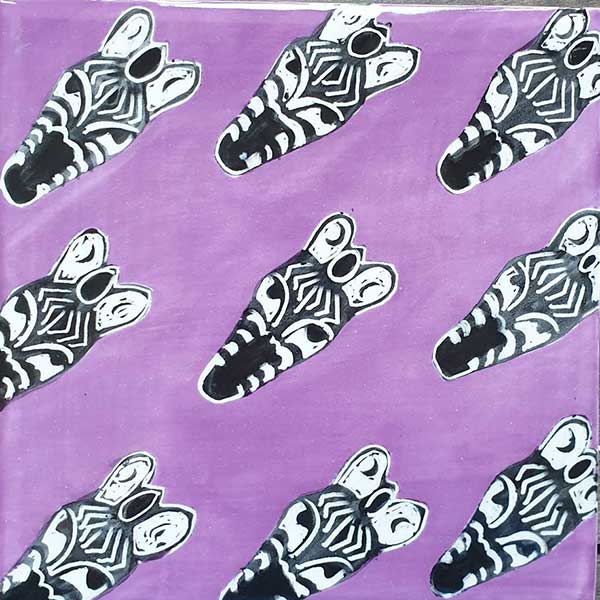
This striking, repeating pattern can be positioned in many ways to create a great modern design. Using paper resist and the sgraffito technique, it’s a great design and works well in many colour ways.
You can also view the printable sheet here. We have also put together a step-by-step guide to creating the zebra heads using the sgraffito technique, take a look here.
Firstly paint the whole area with white paint 1 (Cotton Tail). This is the base to which the zebra heads will stick.
There are several shaped sheets of zebra you can print here which you will need to cut out.
Next work out where you want to position the zebras and use water to stick down the paper shapes to the item. Press down to ensure a close contact. Do not rub the paper.
Paint the whole shape in three layers of 17 (Grapel).
Using a pin, peel off the zebras.
Once the purple paint is dry, fill in the zebra heads using back paint 36 (Tuxedo).
Using a cocktail stick, draw the markings and scratch away the black paint to reveal the white underneath.
Suggested bisque include kitchenware such as salt & pepper shakers and canisters. This design would also work well on the rim of plate.
And if you love this design, why not try our Project Pack? Take a look here
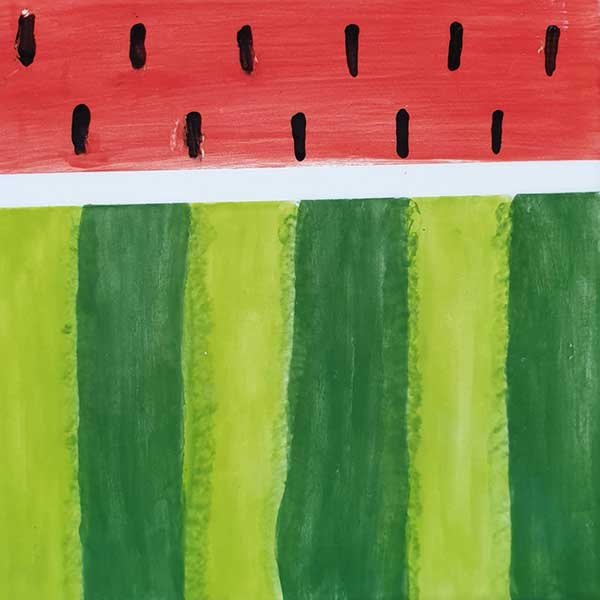
This design is one of the studio’s most popular and accessible designs. It works on every piece of bisque; plates, mugs, jugs, you name it, everything can be turned into a watermelon! For this example, we have used
You’ll need to use a felt tipped pen to divide the green area into an even number of light and dark strips of green. Remember that this ink will not survive the heat of the kiln and will burn away. Also mark L, D, L, D in alternate strips, so you know which colour to paint.
You could also choose to add a white, unpainted band dividing the green and red areas. You could use a strip of washi tape to mask off this area.
Paint the alternate strips with L = 27 (Sour Apple) and D = 31 (Just Froggy). Three layers is best and you can also add texture where the two colours meet. Both a hard edge or a sponged, blended edge work well.
Paint the red area with three layers of 10. Wait until each layer is dry before painting the next.
Once the red is dry, add a few random black seeds and if you’ve used washi tape, peel it off now.
Suggested bisque include tableware such as bowls and mugs. This design would also work well on the rim of plate.
And if you love this design, why not try our Project Pack? Take a look here
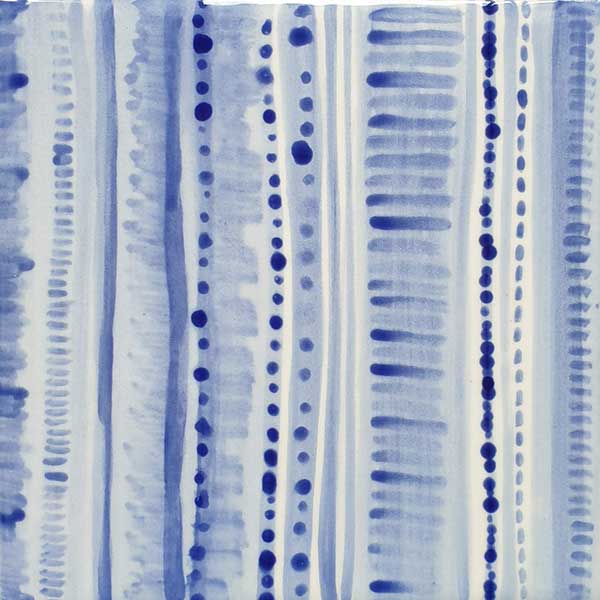
This design uses coats of watered down underglaze (washes) to build up layers of colour and texture utilising vertical lines, dots and mark. The more layers, the darker the colour. This pattern needs to look a little random, and organic. There’s no real ‘mistakes’ with this design.
You can also view an inspiration sheet here showing different designs you could utilise, combinations of dots, vertical stripes and dashes. For this example, we have used 24 – Moody Blue.
Make up a few different consistencies of ‘wash’. You’ll need around 2 or 3 mixes of water and paint.
Mixes should be different combinations of water and paint, to get the layered effect and darkness of colour. The more water you use, the lighter the blue will be and look ‘washed’.
Use wide and thin strokes, in differing widths.
Only use one coat of watery paint as you’ll be adding layers to create darker strokes
Using the back of a paintbrush, add dots to random vertical strips.
Add additional layers of watered down paint on top of the existing washed strips
When all the paint dots and lines are dry, carefully give the whole design another wash over the top. This will knock back the colours so they resemble fabric.
Suggested bisque include kitchenware such as salt & pepper shakers and canisters. This design would also work well on the rim of plate.
And if you love this design, why not try our Project Pack? Take a look here